We are going to build a full stack Todo App using the MEAN (MongoDB, ExpressJS, AngularJS and NodeJS). This is the last part of three-post series tutorial.
MEAN Stack tutorial series:
- AngularJS tutorial for beginners (Part I)
- Creating RESTful APIs with NodeJS and MongoDB Tutorial (Part II)
- MEAN Stack Tutorial: MongoDB, ExpressJS, AngularJS and NodeJS (Part III) 👈 you are here
Before completing the app, let’s cover some background about the this stack. If you rather jump to the hands-on part click here to get started.
Why MEAN stack?
TL; DR: NodeJS has been built from bottom up a non-blocking I/O paradigm, which gives you more efficiency per CPU core than using threads in other languages like Java.
LAMP (Linux-Apache-MySQL-PHP) has dominated web application stack for many years now. Well-known platforms such as Wikipedia, Wordpress, and even Facebook uses it or started with it. Enterprise, usually, used go down the Java path: Hibernate, Spring, Struts, JBoss. More agile frameworks also have been used such as Ruby on Rails and for Python Django and Pylon.

Ubiquitous
Well, it turns out, that JavaScript it is everywhere. It used to be limited to browsers. But, now you can found it in smartphones, servers, robots, Arduino, RaspberryPi… Thus, it does not matter what technology you use to build web applications, you need to be familiar with Javascript. In that case, then, it is a time saver to use wherever it fits, especially for building web applications. MEAN stack is embracing that, using Javascript to create end-to-end web applications. Non-blocking architecture
JavaScript is a dynamic, object-oriented, and functional scripting language. One of the features that make it win over Java Applets decades ago, it was its lightness and non-blocking event loop. Blocking means that when one line of code is executing, the rest of it is locked waiting to finish. On the other hand, non-blocking gives to each line of code a shot and then through callbacks it can come back when an event happens. Programming languages that are blocking (Java, Ruby, Python, PHP, …) overcomes concurrency using many threads of execution while JavaScript handles it using non-blocking event loop in a single thread.
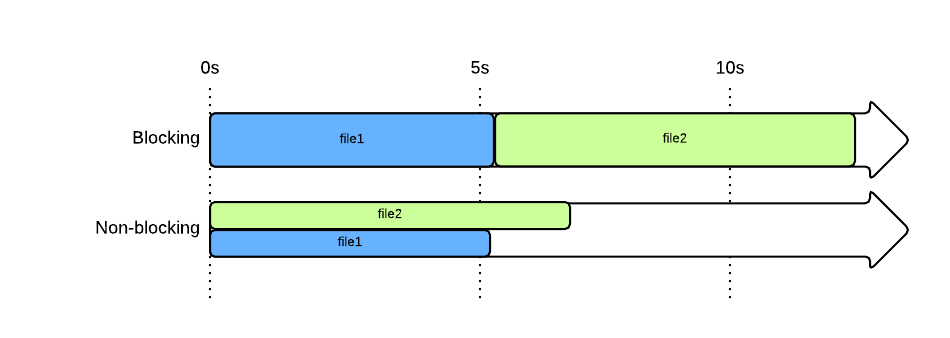
As you can see, a single thread of execution in Node can handle perform multiple tasks vs a non-blocking style that execute each one sequentially. You can read more about it in NodeJS faster than Java article.
Some companies like Paypal moved from Java backend to NodeJS and reported a increased performance, lower average response times, and development speed gains. Similarly happens to Groupon that came from Java/Rails monoliths.
Agile and vibrant community
The community behind Javascript is quite vibrant. It has permeated in almost all the fields of technology: data visualization, server-side, databases, robotics, building tools and many more.
TODO app with MEAN
In this section are going to put together everything that we learnt in the two previous tutorials.
MEAN Backend with MongoDB, ExpressJS and NodeJS
In the previous post, we have gone through the process of building a RESTful API and we are going to be building on top of that. Repository here.
1 | git clone https://github.com/amejiarosario/todoAPIjs.git |
MEAN stack front-end with AngularJS
Similarly, we have build a very lean todoApp in the first part of this tutorial. You can download the file to follow along and see it in action here. You might notice the angularJS app is very simple and even it is entirely in one file for simplicity sake. In further tutorials, we are going to make it more modular, split in files, add tests and stylesheets.
Let’s go first to the ExpressJS app (todoAPIjs) and review the default routing system:
app.jsloads the all the routes.- The root path (
/) is mounted on theroutes/index.js routes/index.jssets the variable title and rendersindex.ejs.
1 | // app.js |
The best place to load our ./views/index.ejs. So let’s copy the body content from ngTodo.html content in there and change in ./routes/index.js title to “ngTodo App”. Don’t forget to add ng-app on the top. <html ng-app="app">.
Wiring up the App
AngularJS Read with $http
As you might notice, in the factory, we have a fixed array. We need to change it to communicate with the API that we just build.
$http is Anguar core sevice that allow to make XMLHttpRequest or jsonp request. You can either pass an object with http verb and url or call call $http.verb ($http.get, $http.post).
$http returns a promise which has a success and error function.
1 | $http({method: 'GET', url: '/todos'}). |
Let’s try it out in our app. Go to views/index.ejs and do this changes:
1 | // Service |
$http.get will request data using the GET method.
Try it in your browser!s If you have data from the previous tutorial you should be able to see it.
To start the server, you can use
1 | npm start |
or if you have it installed
1 | nodemon |
AngularJS Read with $resource
If you click in one of the Todo elements and get redirected to the detail page, you will not see anything yet. We need to update the TodoDetailCtrl first. Even though we already have the GET verb working. We have a different URL requirement for /todos/:id for the other methods. There’s an Angular service that has a higher level of abstraction of $http to deal with RESTful requests. It is called $resource.
Initialize as:
$resource(url, [paramDefaults], [actions], options);
It comes with the following actions already defined; it is missing one though… Can you tell?
1 | { 'get': {method:'GET'}, // get individual record |
The instances are used in the following way (examples will come later):
- GET:
Resource.get([parameters], [success], [error]) - Non-GET:
Resource.action([parameters], postData, [success], [error]) - Non-GET:
resourceInstance.$action([parameters], [success], [error])
$resource is not part of the Angular core, so it requires to ngResource and the dependency. We can get it from the CDN:
1 | <script src="https://ajax.googleapis.com/ajax/libs/angularjs/1.2.25/angular-resource.min.js"></script> |
This is what need to set it up:
1 | // add ngResource dependency |
Angular will render an empty $scope.todos. but, when Todos.query() comes with the data from the server it will re-render the UI.
AngularJS Create
We will need to create a new text box, a button to send a POST request to server and add it to the $scope.
We are using inline templates with
id="/todos.html"andid="/todoDetails.html". They are not physical files. Justng-templatethat we create in the part I of these tutorial series.
Add this code at the bottom of the id="/todos.html" template:
1 | New task <input type="text" ng-model="newTodo"><button ng-click="save()">Create</button> |
Notice that we are using a new directive ng-click, this one executes a function when it clicked. Angular makes sure that the behaviour is consistent across different browsers.
1 | .controller('TodoController', ['$scope', 'Todos', function ($scope, Todos) { |
Show Todo details
Every time you click a todo link, it is showing an empty fields. Let’s fix that. First we need set the real _id to the links instead of $index.
1 | <li ng-repeat="todo in todos | filter: search"> |
1 | .controller('TodoDetailCtrl', ['$scope', '$routeParams', 'Todos', function ($scope, $routeParams, Todos) { |
Notice the change from
$scope.todo = Todos[$routeParams.id];
to
$scope.todo = Todos.get({id: $routeParams.id });
Now you should be able to see the details :)
AngularJS Update (in-line editing)
This is going to be a very cool feature. Let’s meet these new directives:
ng-show: this directive shows the element if the expression evaluates to true. Otherwise, the content is hidden.
ng-change: directive for input elements that evaluates the expression after any change.
Replace the template with id="/todos.html" with the following:
1 | <!-- Template --> |
Now let’s change the controller to handle the inline editing:
1 | .controller('TodoController', ['$scope', 'Todos', function ($scope, Todos) { |
We added a new variable $scope.editing which shows or hides the form to edit the values. Furthermore, notice ng-click functions: edit, update and cancel.
Let’s see what they do. Try it out!
While were are editing notice that we copy the original todo task into the editing variable. This server for two purposes:
It evaluates to
trueand show the forms withng-showIt holds a copy of the original value in case we press cancel.
Now, going to the Todo Details. We would like that to be updated as well and add notes.
1 | <script type="text/ng-template" id="/todoDetails.html"> |
Similarly, we added an update method. However, this time we do not need to pass any index, since it is just one todo at a time. After it has been saved, it goes back to root path /.
1 | .controller('TodoDetailCtrl', ['$scope', '$routeParams', 'Todos', '$location', function ($scope, $routeParams, Todos, $location) { |
Awesome! Time to check it out in the browser!
$location.url([url]) is a getter/setter method that allows us to change url, thus routing/view.
AngularJS Delete
These are the changes added to perform the remove functionality:
A. Add removes button in the li element:
1 | <button ng-show="!editing[$index]" ng-click="remove($index)">remove</button> |
Do the same for the details Template
1 | <button ng-click="remove()">Remove</button> |
B. Add remove functionality in the controllers
1 | $scope.remove = function(index){ |
And also in the details controllers
1 | $scope.remove = function(){ |
When we remove elements from the todos array $scope.todos.splice(index, 1) they also disappear from the DOM. Very cool, huh?
Congratulations! You are now a MEAN developer!
What’s next?
Learn how to use GruntJS to automate repetitive tasks in your MEAN Stack workflow.
Also, you can learn more about full-stack framework solutions.
Full-Stack Javascript Web Frameworks
What we did in these three series tutorial could have been done with just few keystrokes in the comamnd line ;). However, it’s good to know what’s going on. But at this point you do. So, I will introduce you to some frameworks that can save you a lot of time.
Using MEAN.io
MeanIO uses a customized CLI tool: ‘mean’. Its approach for modularity is leaned towards self-contained packages that have code for both client and server files. At moment of writing this, it has nine packages ranging from MEAN-Admin, Translation, file uploads, image crop and more.
Using MEAN.js
MeanJS it is a fork from the creator of MEAN.IO, it uses Yeoman generators to generate Angular’s CRUD modules, routes, controllers, views, services, and more. Also has generators for Express: models, controllers, routes and tests. It has excellent documentation.
Others Frameworks to look at
- Meteor - Meteor is an open-source platform for building top-quality web apps in a fraction of the time, whether you’re an expert developer or just getting started.
- Sails - The web framework of your dreams. for your next web application.
- Yahoo! Mojito - A JavaScript MVC framework for mobile applications, one of the Yahoo! Cocktails.
- Tower.js - Small components for building apps, manipulating data, and automating a distributed infrastructure.