Welcome to this tutorial about RESTful API using Node.js (Express.js) and MongoDB (mongoose)! We are going to learn how to install and use each component individually and then proceed to create a RESTful API.
Check out the updated version of this post with Angular 9+, Node.js 12+ in here: Modern MEAN Stack Tutorial with Docker
MEAN Stack tutorial series:
- AngularJS tutorial for beginners (Part I)
- Creating RESTful APIs with NodeJS and MongoDB Tutorial (Part II) 👈 you are here
- MEAN Stack Tutorial: MongoDB, ExpressJS, AngularJS and NodeJS (Part III)
What is a RESTful API?
REST stands for Representational State Transfer. It is an architecture that allows client-server communication through a uniform interface. REST is stateless, cachable and has property called idempotence. It means that the side effect of identical requests have the same side-effect as a single request.
HTTP RESTful API’s are compose of:
- HTTP methods, e.g. GET, PUT, DELETE, PATCH, POST, …
- Base URI, e.g.
http://adrianmejia.com - URL path, e.g.
/blog/2014/10/01/creating-a-restful-api-tutorial-with-nodejs-and-mongodb/ - Media type, e.g.
html,JSON,XML,Microformats,Atom,Images…
Here is a summary what we want to implement:
| Resource (URI) | POST (create) | GET (read) | PUT (update) | DELETE (destroy) |
|---|---|---|---|---|
| /todos | create new task | list tasks | N/A (update all) | N/A (destroy all) |
| /todos/1 | error | show task ID 1 | update task ID 1 | destroy task ID 1 |
NOTE for this tutorial:
- Format will be JSON.
- Bulk updates and bulk destroys are not safe, so we will not be implementing those.
- CRUD functionality: POST == CREATE, GET == READ, PUT == UPDATE, DELETE == DELETE.
Installing the MEAN Stack Backend
In this section, we are going to install the backend components of the MEAN stack: MongoDB, NodeJS and ExpressJS. If you already are familiar with them, then jump to wiring the stack. Otherwise, enjoy the ride!
Installing MongoDB
MongoDB is a document-oriented NoSQL database (Big Data ready). It stores data in JSON-like format and allows users to perform SQL-like queries against it.
You can install MongoDB following the instructions here.
If you have a Mac and brew it’s just:
1 | brew install mongodb && mongod |
In Ubuntu:
1 | sudo apt-get -y install mongodb |
After you have them installed, check version as follows:
1 | ## Mac |
Installing NodeJS
The Node official definition is:
Node.js® is a JavaScript runtime built on Chrome’s V8 JavaScript engine. Node.js uses an event-driven, non-blocking I/O model that makes it lightweight and efficient. Node.js’ package ecosystem, npm, is the largest ecosystem of open source libraries in the world.
In short, NodeJS allows you to run Javascript outside the browser, in this case, on the web server. NPM allows you to install/publish node packages with ease.
To install it, you can go to the NodeJS Website.
Since Node versions changes very often. You can use the NVM (Node Version Manager) on Ubuntu and Mac with:
1 | ## download NPM |
Check out https://github.com/creationix/nvm for more details.
Also, on Mac and brew you can do:
1 | brew install nodejs |
After you got it installed, check node version and npm (node package manager) version:
1 | node -v |
Installing ExpressJS
ExpressJS is a web application framework that runs on NodeJS. It allows you to build web applications and API endpoints. (more details on this later).
We are going to create a project folder first, and then add express as a dependency.
Let’s use NPM init command to get us started.
1 | ## create project folder |
Notice that after the last command, express should be added to package.json with the version 4.14.x.
Using MongoDB with Mongoose
Mongoose is an NPM package that allows you to interact with MongoDB. You can install it as follows:
1 | npm install mongoose@4.5.8 --save |
If you followed the previous steps, you should have all you need to complete this tutorial. We are going to build an API that allow users to CRUD (Create-Read-Update-Delete) Todo tasks from database.
Mongoose CRUD
CRUD == Create-Read-Update-Delete
We are going to create, read, update and delete data from MongoDB using Mongoose/Node. First, you need to have mongodb up and running:
1 | ## run mongo daemon |
Keep mongo running in a terminal window and while in the folder todoApp type node to enter the node CLI. Then:
1 | // Load mongoose package |
Great! Now, let’s test that we can save and edit data.
Mongoose Create
1 |
|
If you take a look to Mongo you will notice that we just created an entry. You can easily visualize data using Robomongo:

You can also build the object and save it in one step using create:
1 | Todo.create({name: 'Create something with Mongoose', completed: true, note: 'this is one'}, function(err, todo){ |
Mongoose Read and Query
So far we have been able to save data, now we are going explore how to query the information. There are multiple options for reading/querying data:
- Model.find(conditions, [fields], [options], [callback])
- Model.findById(id, [fields], [options], [callback])
- Model.findOne(conditions, [fields], [options], [callback])
Some examples:
1 | // Find all data in the Todo collection |
The result is something like this:
1 | [ { _id: 57a6116427f107adef36c2f2, |
You can also add queries
1 | // callback function to avoid duplicating it all over |
You can chain multiple queries, e.g.:
1 | var oneYearAgo = new Date(); |
MongoDB query language is very powerful. We can combine regular expressions, date comparison and more!
Mongoose Update
Moving on, we are now going to explore how to update data.
Each model has an update method which accepts multiple updates (for batch updates, because it doesn’t return an array with data).
- Model.update(conditions, update, [options], [callback])
- Model.findByIdAndUpdate(id, [update], [options], [callback])
- Model.findOneAndUpdate([conditions], [update], [options], [callback])
Alternatively, the method findOneAndUpdate could be used to update just one and return an object.
1 |
|
As you might noticed the batch updates (multi: true) doesn’t show the data, rather shows the number of fields that were modified.
1 | { ok: 1, nModified: 1, n: 1 } |
Here is what they mean:
nmeans the number of records that matches the querynModifiedrepresents the number of documents that were modified with update query.
Mongoose Delete
update and remove mongoose API are identical, the only difference it is that no elements are returned. Try it on your own ;)
- Model.remove(conditions, [callback])
- Model.findByIdAndRemove(id, [options], [callback])
- Model.findOneAndRemove(conditions, [options], [callback])
ExpressJS and Middlewares
ExpressJS is a complete web framework solution. It has HTML template solutions (jade, ejs, handlebars, hogan.js) and CSS precompilers (less, stylus, compass). Through middlewares layers, it handles: cookies, sessions, caching, CSRF, compression and many more.
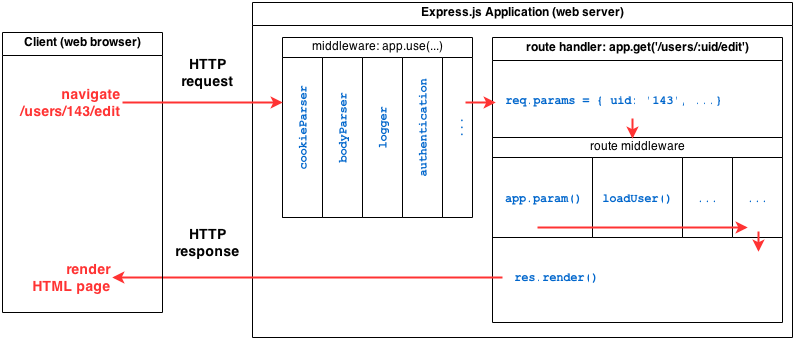
Middlewares are pluggable processors that runs on each request made to the server. You can have any number of middlewares that will process the request one by one in a serial fashion. Some middlewares might alter the request input. Others, might create log outputs, add data and pass it to the next() middleware in the chain.
We can use the middlewares using app.use. That will apply for all request. If you want to be more specific, you can use app.verb. For instance: app.get, app.delete, app.post, app.update, …
Let’s give some examples of middlewares to drive the point home.
Say you want to log the IP of the client on each request:
1 | app.use(function (req, res, next) { |
Notice that each middleware has 3 parameters:
req: contain all the requests objects like URLs, path, …res: is the response object where we can send the reply back to the client.next: continue with the next middleware in the chain.
You can also specify a path that you want the middleware to activate on.
1 | app.use('/todos/:id', function (req, res, next) { |
And finally you can use app.get to catch GET requests with matching routes, reply the request with a response.send and end the middleware chain. Let’s use what we learned on mongoose read to reply with the user’s data that matches the id.
1 | app.get('/todos/:id', function (req, res, next) { |
Notice that all previous middlewares called next() except this last one, because it sends a response (in JSON) to the client with the requested todo data.
Hopefully, you don’t have to develop a bunch of middlewares besides routes, since ExpressJS has a bunch of middlewares available.
Default Express 4.0 middlewares
morgan: logger
body-parser: parse the body so you can access parameters in requests in
req.body. e.g.req.body.name.cookie-parser: parse the cookies so you can access parameters in cookies
req.cookies. e.g.req.cookies.name.serve-favicon: exactly that, serve favicon from route
/favicon.ico. Should be call on the top before any other routing/middleware takes place to avoids unnecessary parsing.
Other ExpressJS Middlewares
The following middlewares are not added by default, but it’s nice to know they exist at least:
compression: compress all request. e.g.
app.use(compression())session: create sessions. e.g.
app.use(session({secret: 'Secr3t'}))method-override:
app.use(methodOverride('_method'))Override methods to the one specified on the_methodparam. e.g.GET /resource/1?_method=DELETEwill becomeDELETE /resource/1.response-time:
app.use(responseTime())addsX-Response-Timeheader to responses.errorhandler: Aid development, by sending full error stack traces to the client when an error occurs.
app.use(errorhandler()). It is good practice to surround it with an if statement to checkprocess.env.NODE_ENV === 'development'.vhost: Allows you to use different stack of middlewares depending on the request
hostname. e.g.app.use(vhost('*.user.local', userapp))andapp.use(vhost('assets-*.example.com', staticapp))whereuserappandstaticappare different express instances with different middlewares.csurf: Adds a Cross-site request forgery (CSRF) protection by adding a token to responds either via
sessionorcookie-parsermiddleware.app.use(csrf());timeout: halt execution if it takes more that a given time. e.g.
app.use(timeout('5s'));. However you need to check by yourself under every request with a middleware that checksif (!req.timedout) next();.
Wiring up the MEAN Stack
In the next sections, we are going to put together everything that we learn from and build an API. They can be consume by browsers, mobile apps and even other servers.

Bootstrapping ExpressJS
After a detour in the land of Node, MongoDB, Mongoose, and middlewares, we are back to our express todoApp. This time to create the routes and finalize our RESTful API.
Express has a separate package called express-generator, which can help us to get started with out API.
1 | ## install it globally using -g |
This will create a new folder called todo-api. Let’s go ahead and install the dependencies and run the app:
1 | ## install dependencies |
Use your browser to go to http://0.0.0.0:4000, and you should see a message “Welcome to Express”
Connect ExpressJS to MongoDB
In this section we are going to access MongoDB using our newly created express app. Hopefully, you have installed MongoDB in the setup section, and you can start it by typing (if you haven’t yet):
1 | mongod |
Install the MongoDB driver for NodeJS called mongoose:
1 | npm install mongoose --save |
Notice --save. It will add it to the todo-api/package.json
Next, you need to require mongoose in the todo-api/app.js
1 | // load mongoose package |
Now, When you run npm start or ./bin/www, you will notice the message connection successful. Great!
You can find the repository here and the diff code at this point: diff
Creating the Todo model with Mongoose
It’s show time! All the above was setup and preparation for this moment. Let bring the API to life.
Create a models directory and a Todo.js model:
1 | mkdir models |
In the models/Todo.js:
1 | var mongoose = require('mongoose'); |
What’s going on up there? Isn’t MongoDB suppose to be schemaless? Well, it is schemaless and very flexible indeed. However, very often we want bring sanity to our API/WebApp through validations and enforcing a schema to keep a consistent structure. Mongoose does that for us, which is nice.
You can use the following types:
- String
- Boolean
- Date
- Array
- Number
- ObjectId
- Mixed
- Buffer
API clients (Browser, Postman and curl)
I know you have not created any route yet. However, in the next sections you will. These are just three ways to retrieve, change and delete data from your future API.
Curl
1 | ## Create task |
Browser and Postman
If you open your browser and type localhost:3000/todos you will see all the tasks (when you implement it). However, you cannot do post commands by default. For further testing let’s use a Chrome plugin called Postman. It allows you to use all the HTTP VERBS easily and check x-www-form-urlencoded for adding parameters.

Don’t forget to check
x-www-form-urlencodedor it won’t work ;)
Websites and Mobile Apps
Probably these are the main consumers of APIs. You can interact with RESTful APIs using jQuery’s $ajax and its wrappers, BackboneJS’s Collections/models, AngularJS’s $http or $resource, among many other libraries/frameworks and mobile clients.
In the end, we are going to explain how to use AngularJS to interact with this API.
ExpressJS Routes
To sum up we want to achieve the following:
| Resource (URI) | POST (create) | GET (read) | PUT (update) | DELETE (destroy) |
|---|---|---|---|---|
| /todos | create new task | list tasks | error | error |
| /todos/:id | error | show task :id | update task :id | destroy task ID 1 |
Let’s setup the routes
```bash Create a new route called todos.js in the routes folder or rename users.js
mv routes/users.js routes/todos.js
1 |
|
All set! Now, let’s go back and edit our routes/todos.js.
List: GET /todos
Remember mongoose query api? Here’s how to use it in this context:
1 | var express = require('express'); |
Harvest time! We don’t have any task in database but at least we verify it is working:
1 | ## Start database |
If it returns an empty array [] you are all set. If you get errors, try going back and making sure you didn’t forget anything, or you can comment at the end of the post for help.
Create: POST /todos
Back in routes/todos.js, we are going to add the ability to create using mongoose create. Can you make it work before looking at the next example?
1 |
|
A few things:
- We are using the
router.postinstead ofrouter.get. - You have to stop and run the server again:
npm start.
Everytime you change a file you have to stop and start the web server. Let’s fix that using nodemon to refresh automatically:
1 | ## install nodemon globally |
Show: GET /todos/:id
This is a snap with Todo.findById and req.params. Notice that params matches the placeholder name we set while defining the route. :id in this case.
1 | /* GET /todos/id */ |
Let’s test what we have so far!
1 | ## Start Web Server on port 4000 (default is 3000) |
Update: PUT /todos/:id
Back in routes/todos.js, we are going to update tasks. This one you can do without looking at the example below, review findByIdAndUpdate and give it a try!
1 | /* PUT /todos/:id */ |
1 | ## Use the ID from the todo, in my case 57a655997d2241695585ecf8 |
Destroy: DELETE /todos/:id
Finally, the last one! Almost identical to update, use findByIdAndRemove.
1 | /* DELETE /todos/:id */ |
Is it working? Cool, you are done then! Is NOT working? take a look at the full repository.
What’s next?
Connecting AngularJS with this endpoint. Check out the third tutorial in this series.